Best Practices for Using the Lessons Tool - Design
Overview:
-
Please read “Lessons – Basics” before reading this document.
-
This document discusses advanced features of the Lessons tool such as customizing page layout, structuring pages, conditional release, checklist, student page, and many more.
-
Potentially Lessons can be designed to be the central hub of all materials and learning activities of a course site and streamline the learning path for students.
NOTE : The Lessons tool is a sophisticated tool that allows the instructor more flexibility and customization. Please contact the Help Desk if you would like a consultation on advanced features and sample user cases.
Sample Lessons Page (Click to Expand)
Sample Lessons Page
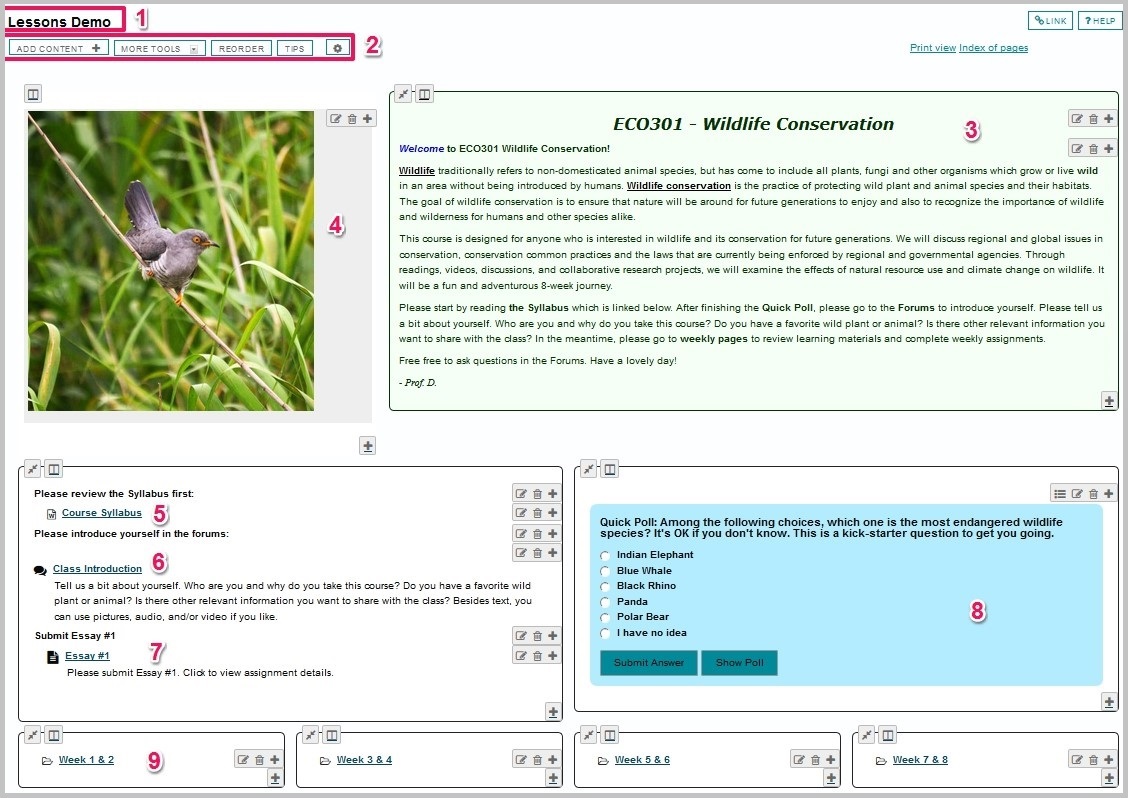
a. Lessons page title
b. Lesson menu bar (click open to see the action buttons)
c. Text content with green background on a Lessons page which occupies 2/3 of this horizontal section
d. Image with transparent background embedded on a Lessons page which occupies 1/3 of this horizontal section
e. WORD document linked on the page
f. Forum topic linked on the page with detailed description
g. Assignment linked on the page with brief description
h. Quick question with blue background
i. Subpage linked on the page
Customizing Page Layout (Click to Expand)
Customizing Page Layout
NEW FEATURE: When content items are added to a Lessons page, everything is displayed in a linear order vertically in one block with rounded-corner borders. Visually, it appears as one block. Adding multiple sections and columns on a Lessons page breaks up this one big block into smaller blocks so that the page is more readable and visually more appealing. It also reduces white space on a page.
Adding a Section Break (Click to Expand)
Adding a Section Break
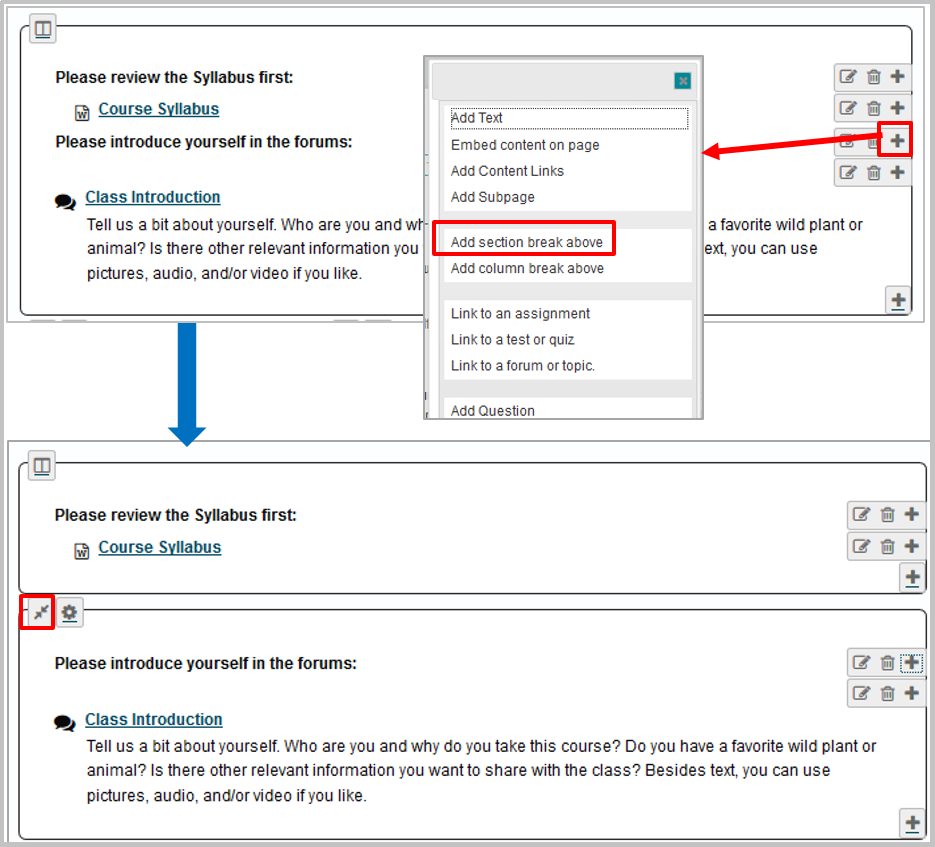
A section is defined as one block with rounded-corner borders from the left edge to the right edge of one Lessons page. One section may contain one or multiple columns.
Creating sections involves 2 steps:
a.Click the + button to the right of the item above which you want to add a section break. This will open the Add menu.
b.Click “Add section break above”.
Adding a Column Break (Click to Expand)
Adding a Column Break
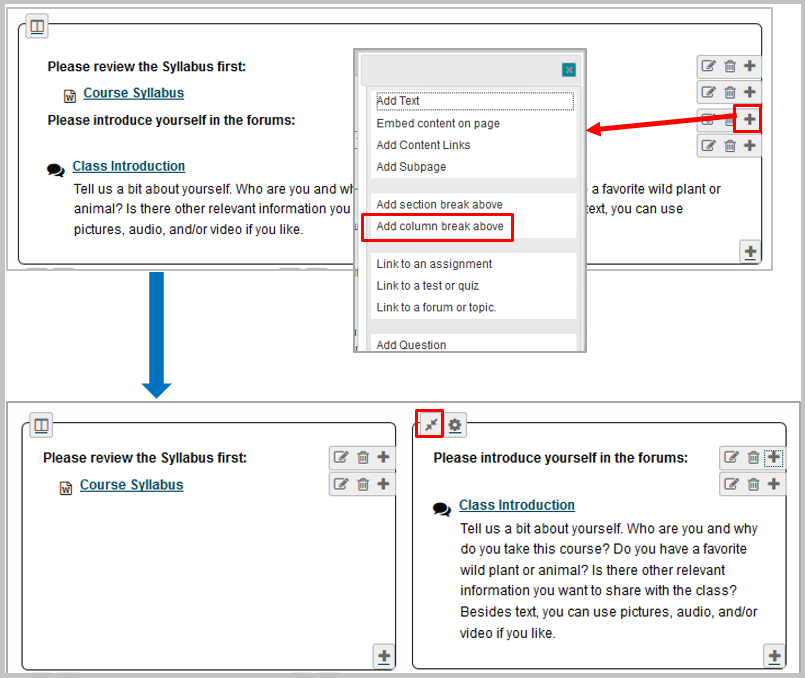
Adding two columns on a Lessons page breaks up one big block or one section into smaller pieces so that the page is more readable and flows better. It also makes better use of the white space on the page.
Creating sections involves 2 steps:
a.Click the + button to the right of the item above which you want to add a column break. This will open the Add menu.
b.Click “Add column break above”.
Merging Sections and Columns (Click to Expand)
Merging Sections and Columns
Sections and columns can be merged in two different ways.
a.Method 1: Click the Merge button  at the top left corner of an item.
b.Method 2: On the “Reorder” page, click the red X to delete the column/section break.
The two sections or columns will be merged to be one big block with borders around them. All items will be displayed in order vertically inside the content block borders.
Creating Two Columns within One Block (Click to Expand)
Creating Two Columns within One Block
Each of the blocks on a Lessons page can be broken into two columns inside its borders. To create two columns inside a block, follow the steps below.
a.Add at least two content items in one block.
b.Click the Column Properties button  located on the top left corner of the content block.
c.In the Column Properties pop-up window, check the box for Two columns inside this one, text flows between them.
d.Click Save. You will now see two columns side-by-side inside the borders of a single content block.
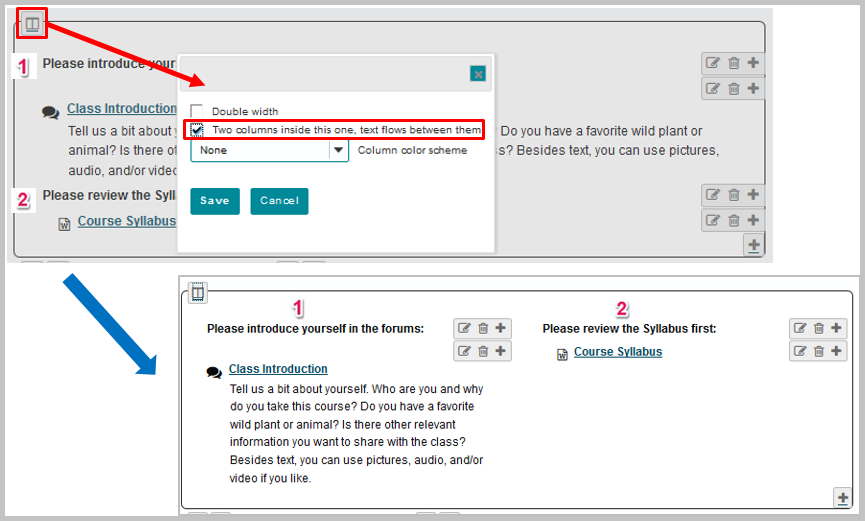
NOTE: you are also be able to change the block background color or choose the “Double width” option in the Column Properties window.
Creating Multiple Lessons Pages (Click to Expand)
Creating Multiple Lessons Pages
The Lesson tool allows great flexibility to structure materials on multiple pages. Here are two ways to structure your materials using multiple pages.
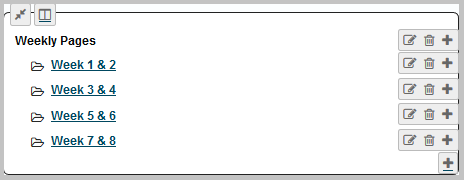
Option #1: One main page with multiple subpages
a.On the Lesson page, create text content as header, such as "Weekly Pages."
b. Create subpages one after another with descriptive titles in a sequential order.
c. Go to each individual subpage to add content or other subpages.
Option #2: One starting page with multiple content pages on the same level
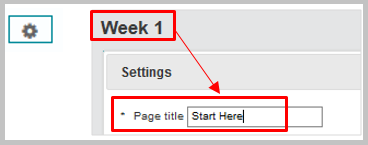
a. On the Lessons page, click on the little gear icon on the very right edge of the page to edit the title to indicate this is the starting point of the lessons pages of this site.
b. Select the "Add More Pages" option from the "More Tools" drop-down menu.
c. Provide a title for a top level page to be added to the left menu area.
d. You can create multiple top level pages by providing the number of pages you want to create.
e. Click "Save" to add multiple pages to the left menu area.
Conditional Release and Sequencing Learning Tasks (Click to Expand)
Conditional Release and Sequencing Learning Tasks
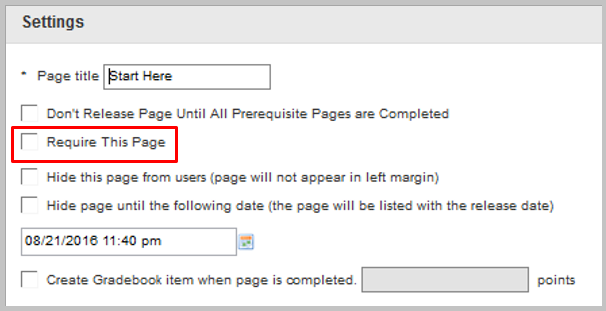
The Lessons tool allows the functionality to set up open dates of pages and prerequisites for learning tasks on these lesson pages. This functionality is achieved by editing the settings of top-level pages, subpages, and individual elements on a page.
On one Lessons page, click on the little gear icon on the top menu are of the page. You can:
a.Set up open date
b.Hide the page when you want to close it or if it is under construction
c.Set it up as a required page with a grade
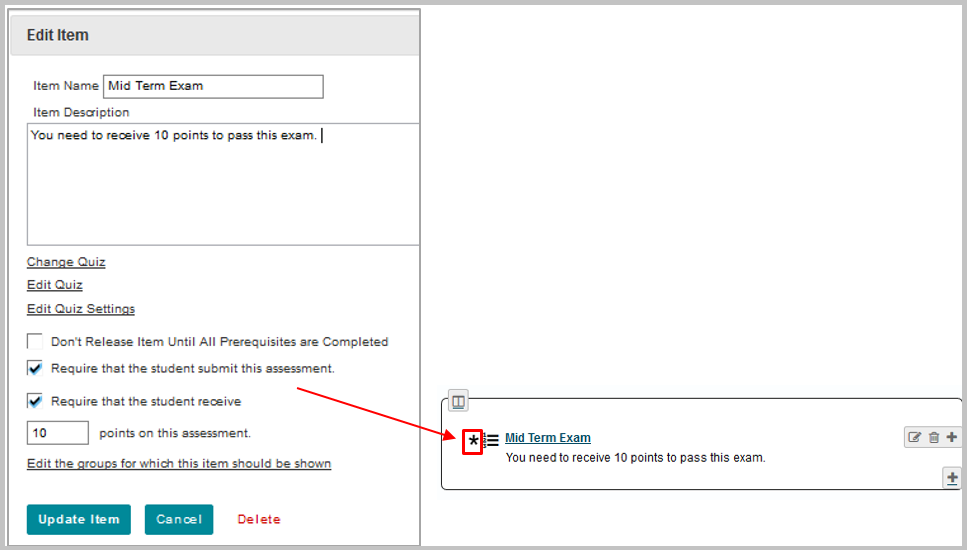
For individual items on a page, you can set up different requirements. Here is an example to set up a required quiz:
a.Click the "Edit" button to the left of the quiz.
b.In the pop-up window, add description.
c.Check the box for requirements and add points if needed
d.Click "Update Item" button.
e.Then you will see an asterisk added to the left of the quiz. Once the quiz is completed successfully, the asterisk will disappear and be replaced by a green checkmark. The student will then be able to move on to the next learning task.
Interactive Features in Lessons (Click to Expand)
Interactive Features in Lessons
Besides disseminating learning materials, the Lessons tool has interactive features that allow students to provide feedback, conduct quick self-test, and track their learning progress.
NEW FEATURE: These student activities can also be graded and scores sent to the Gradebook.
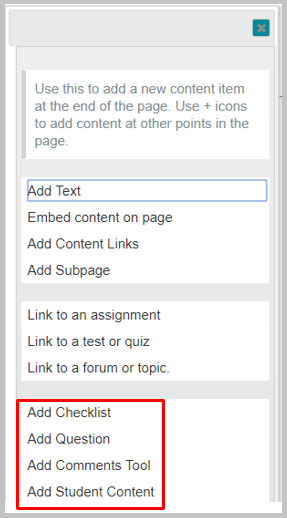
Click the "Add Content" drop-down menu on the top of the page and then click on any of the action buttons to add the following interactive activities:
a. Checklist
b. Question
c. Comments Tool
d. Student Content
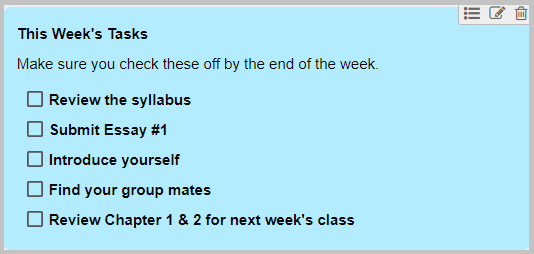
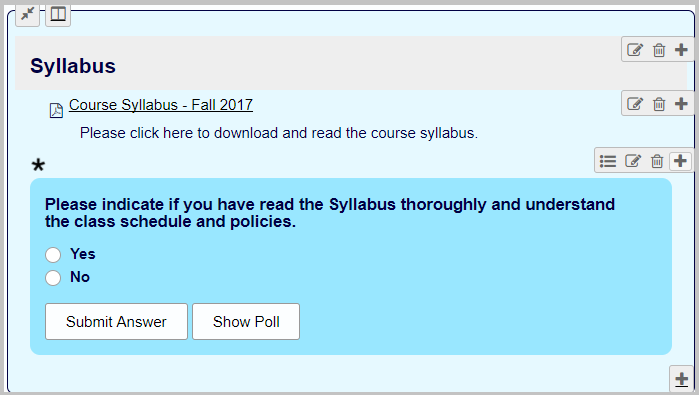
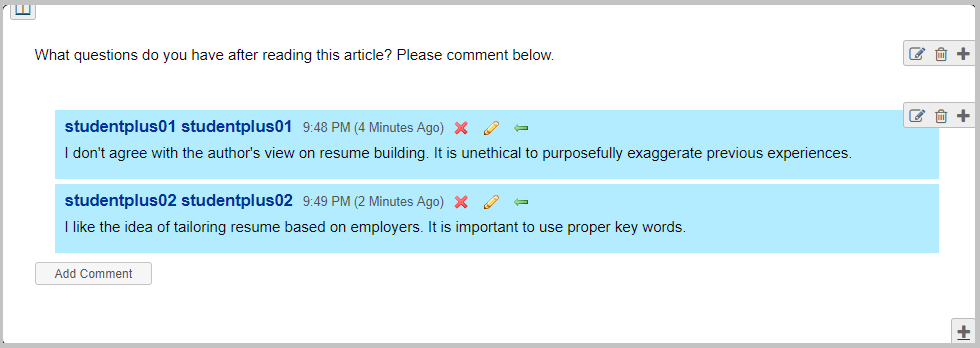
Here are examples of these interactive features:
Checklist:
Quick Question (Self-test):
Comment Tool:
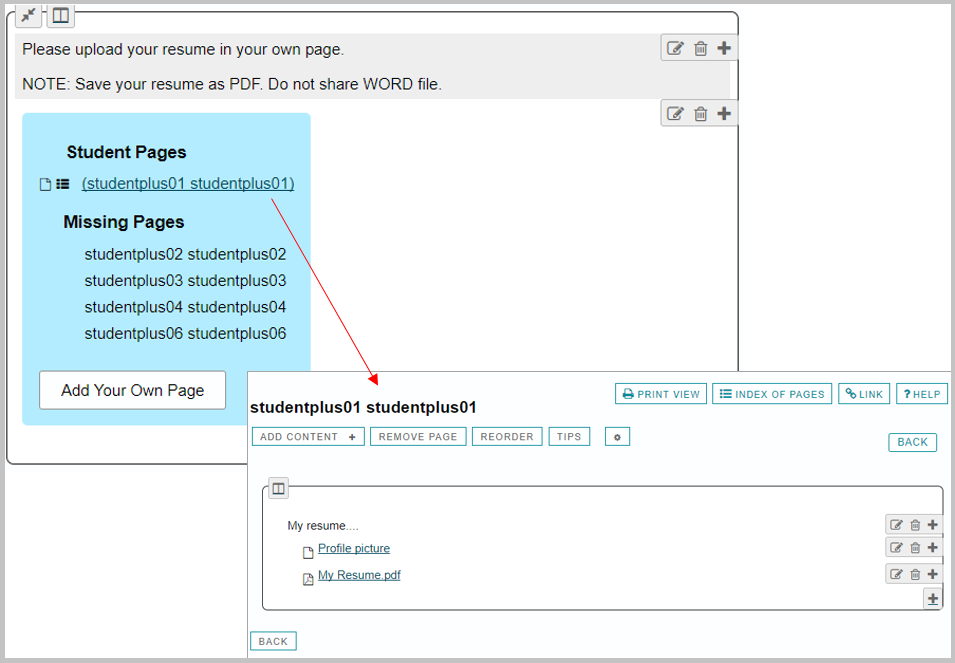
Student Content:
NOTE: Settings of the Lessons tool can be complicated when you try to create multiple pages, set up conditional release, and use Student Content function. Should you have any questions, please contact the Help Desk for a consult.